How to Set Up Microsoft Teams for Project Management: A Step-by-Step Guide
Ready to level up your project management? In today’s blog, I’ll show you how to set up Microsoft Teams to keep your team organized, on track, and working smoothly 👍
Let's get You Started
Today, I'm going to guide you through the process of setting up Microsoft Teams to effectively manage your projects. Whether you're new to Teams or looking to reset your current setup, this blog will provide you with practical tips and insights to optimize your project management in Teams. From creating the MS team to organizing tasks and collaborating seamlessly, we've got you covered. Let's dive in and transform the way you manage projects with MS Teams!
Let's define what we mean by: Projects, Processes and Tasks
Before we get into the specifics, we need to make sure we are all talking about the same thing. When we think about managing work within Microsoft Teams there are generally three categories:
- Projects = initiatives with specific goals and deadlines, likely a "one-time" project and no two projects are exactly the same
- Processes = on-demand, ongoing or cyclical sequence of tasks to produce a desired outcome, (may repeat weekly, monthly, or annually)
- Tasks = individual actions that contribute to the completion of projects and processes
Examples

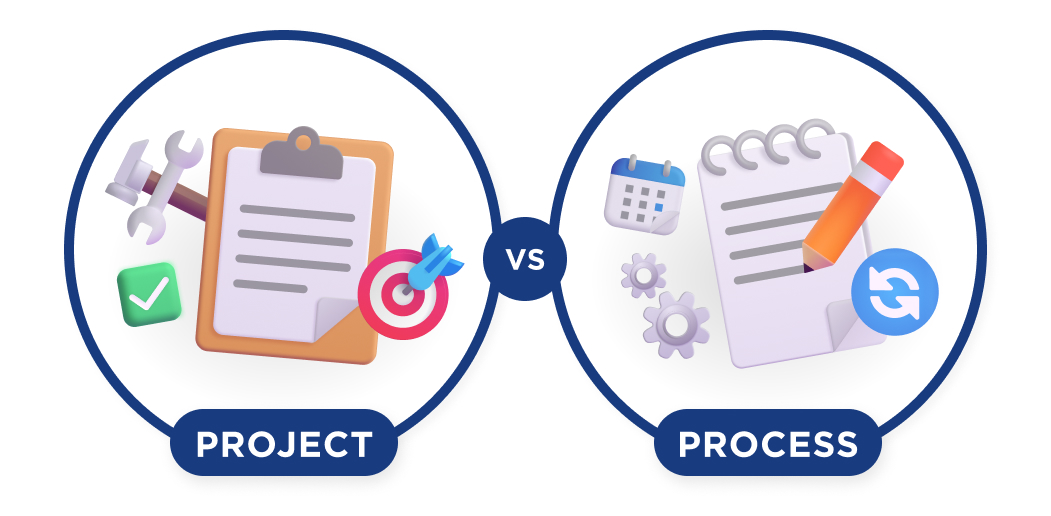
For this blog, I'm going to focus on managing "Projects" in MS Teams not "Processes." You can use MS Teams to manage all your work, but I want to narrow our focus to managing "projects" to demonstrate how to set up a team for that specific purpose - otherwise this would get longer than a blog post! 🙂
🗨️ Let me know in the comments if you want me to write more blogs focusing on how to use MS tools for process management or general work management.
Step 1: ✅Create MS Team and First Channel
How to Set Up a "Project Team" in MS Teams
To set up a new project team, start by creating a new team in MS Teams and adding members who will be involved in the project. We like to think of an "MS Team" as the overarching group of people who will be working together to complete a project. Each organization and project are a bit different, so there is nuance but let's narrow our focus to an actual example to ground what I'm saying in a practical sense.
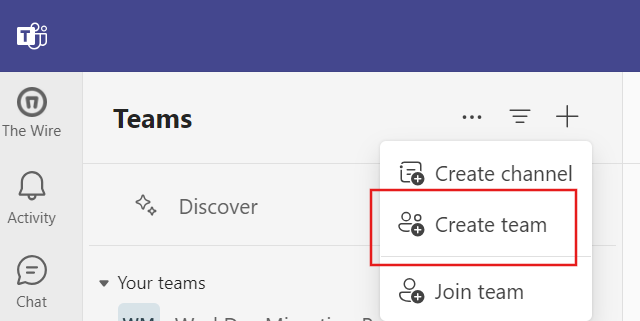
Example
- Project = Migrating an organization onto a new HR system
- MS Team = HR team members and IT team members involved with the HR System Migration Project
📌 Sometimes projects are really small and limited to just a few people who are already part of a MS Team. You can create a dedicated channel for the smaller project in this case. We strongly recommend that if the project is of significant size and importance, it really is best practice to always create a dedicated team as it can save you time in the future.
📌 Advanced technique: often projects have multiple groups of people who are all involved in the same project. We always recommend creating a Team that would include everyone, and then you can create additional Teams, Private Channels, or Shared Channels as well.
Channel Creation
Within that "MS Team" you are started with one channel automatically. And you have the option to create more channels. If you are just starting out on your MS Teams journey, I'd recommend keeping things simple and using only that first channel. This will allow you to create a kind of "hub" for your project so that your team knows where to come for all of the communication and resources related to the project. Creating this single source of truth is key to reaping the benefits of MS Teams for project management as it will give your team a single place to go for project information and communication.
Example
MS Team = WorkDay Migration Project (HR team members and IT team members)
Channels
- General* = first channel created by default
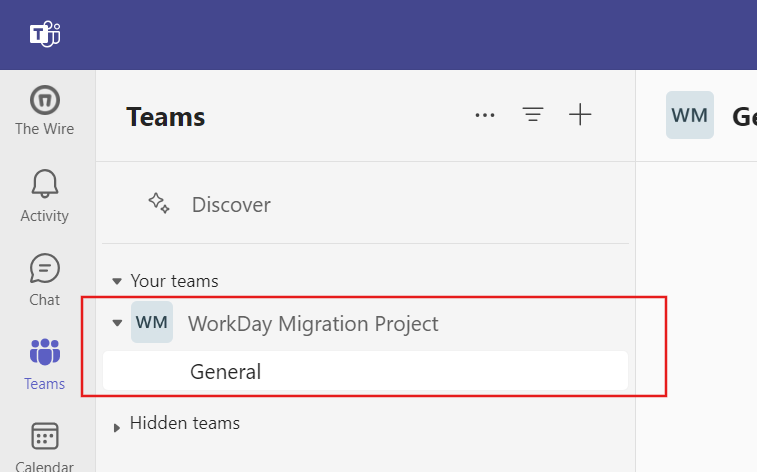
*General Channel - Previously, MS Teams always named the first channel "General" by default, and you could not change that name. Now, you have the option to change the name, but once changed you cannot rename it back to "General" so do so at your own risk. 💀 We suggest "All" or "Main" as alternatives. "All" or "Announcements" is great because it stays at the top of the channels list due to alphabetical order, while "Main" is great to signal team-wide announcements.
If you are already using MS Teams heavily, it's important to conduct an audit of your Teams or start with a fresh set of Teams so that have a strong structure before diving into setting up projects. You want to have the correct people, permissions, and security set up at the foundational level of the MS Team first, before jumping into managing projects within that team.


Is Team Communication Holding You Back?
Find Out in Just 2 Minutes.
Take our quick scorecard to uncover communication gaps and hidden barriers within your team.
Step 2: ✏️ Set up the Tabs in the Channel (the fun part)
Organizing Project Information with Tabs
Once your project MS Team is set up, you can start organizing project info by using the tabs at the top of the channel. These tabs will serve as the "single source of truth" for the project, providing a centralized hub for all related information and resources. Another bonus is that these resources inherit the permissions you set up when creating the team, allowing you to use all of these resources while keeping your project organized and secure. The only exception to this permissions inheritance is Loop but I'll share what to do about that below.

Posts (in Channel)
Effective communication is key to project success. All of the communication about this project between people who work at your organization should take place here within the channel. Use the Posts tab as the "channel chat." In this feed, you can chat back and forth with the project team, create channel meetings (video calls), and file-share to keep everyone in sync and working together efficiently. Posts in channels help maintain clear and organized communication. You can create a post or an announcement, depending on the type of content you are sharing.
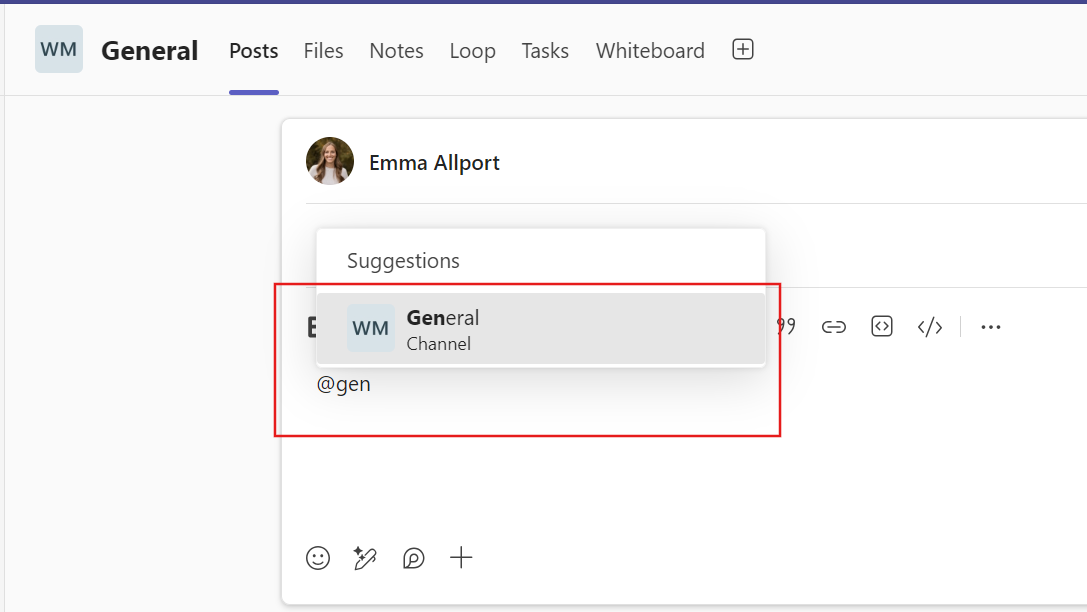
📌 Pro-tip: Remember to @ tag the channel (example: "@All" if the channel name is "All" or @General if the channel name is "General") or specific members (example: @matt or @mike) to ensure they receive a notification.
Files
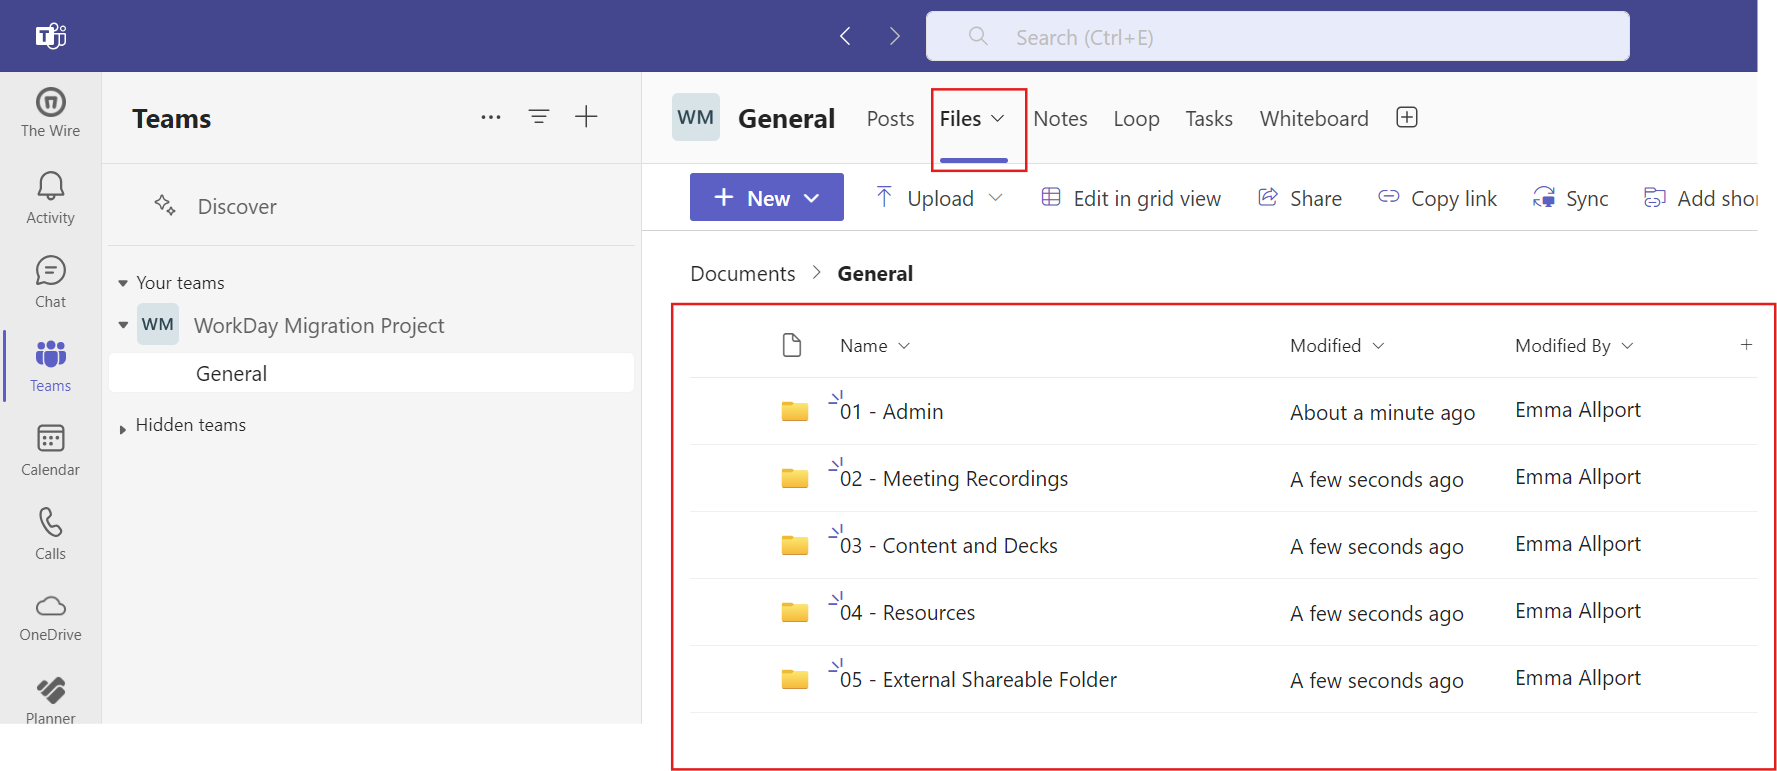
When you create a Team, Microsoft also automatically creates an associated SharePoint team site and links it to this MS Team in the "Files" tab. Collaborating on documents is essential during projects. When you store the files related to your project in your project MS Team, you make these files accessible to the entire project team and it makes it much easier to collaborate when they are in the same place as all the other project communication and information. Use the Files tab to share and work on all of the project documents together, ensuring everyone has access to the latest versions and can contribute in real-time.
📌 Pro-tip: I create a filing system ahead of time to help give my team structure on where to save items. Do what works for you.
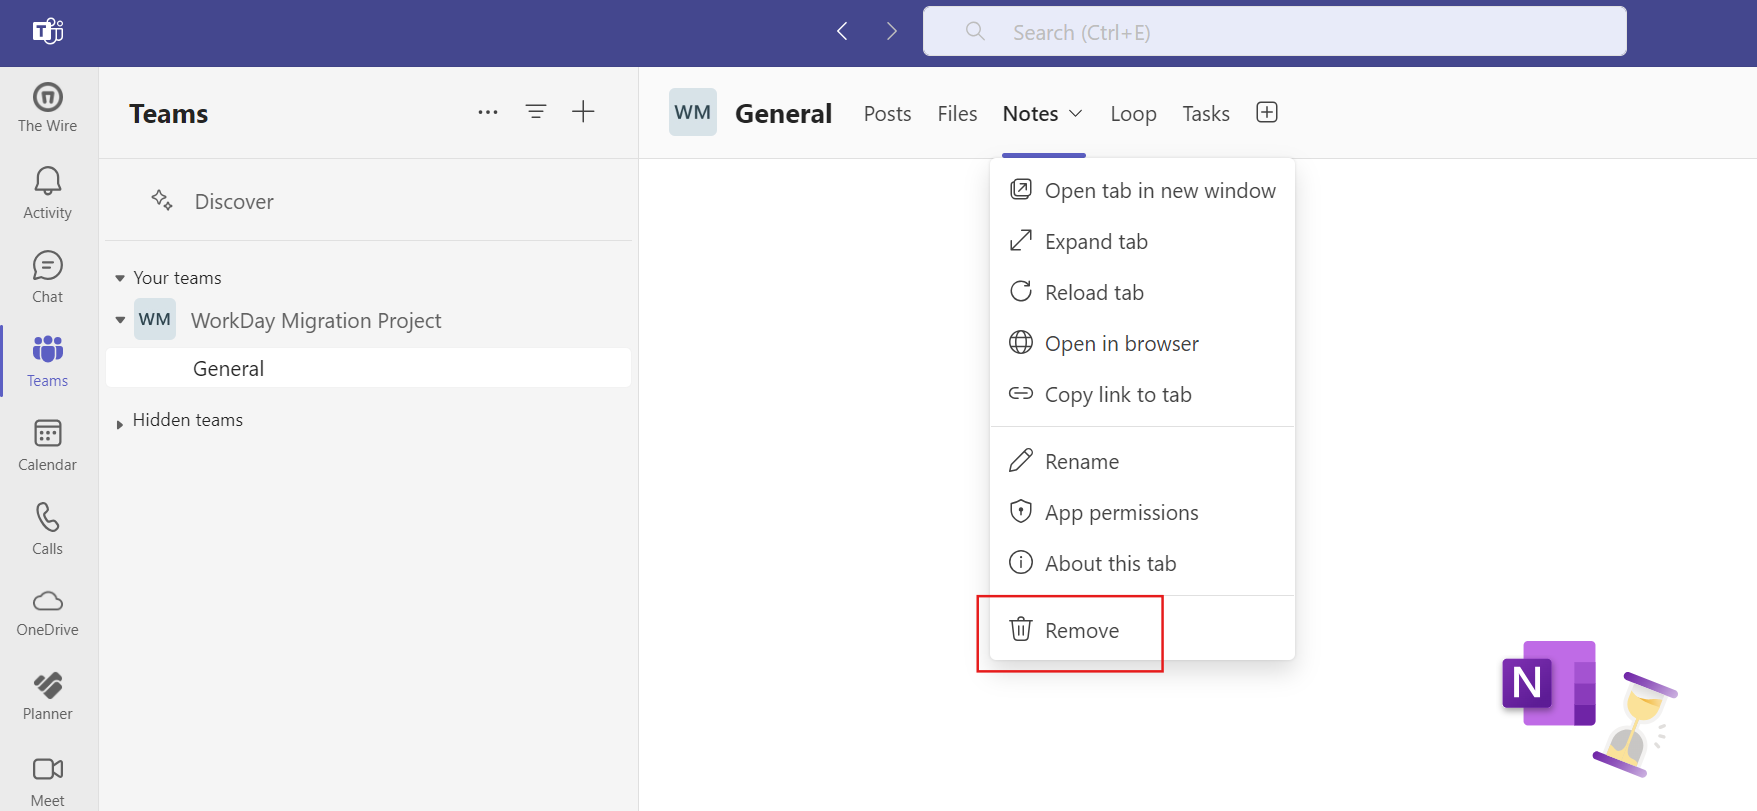
Remove the default "Notes" OneNote Tab
Now that we can use Loop, you should remove the "Notes" tab connected to the OneNote for this Team to cut down on any confusion for your team on where notes should be placed.
Add in Loop - for Notes & More
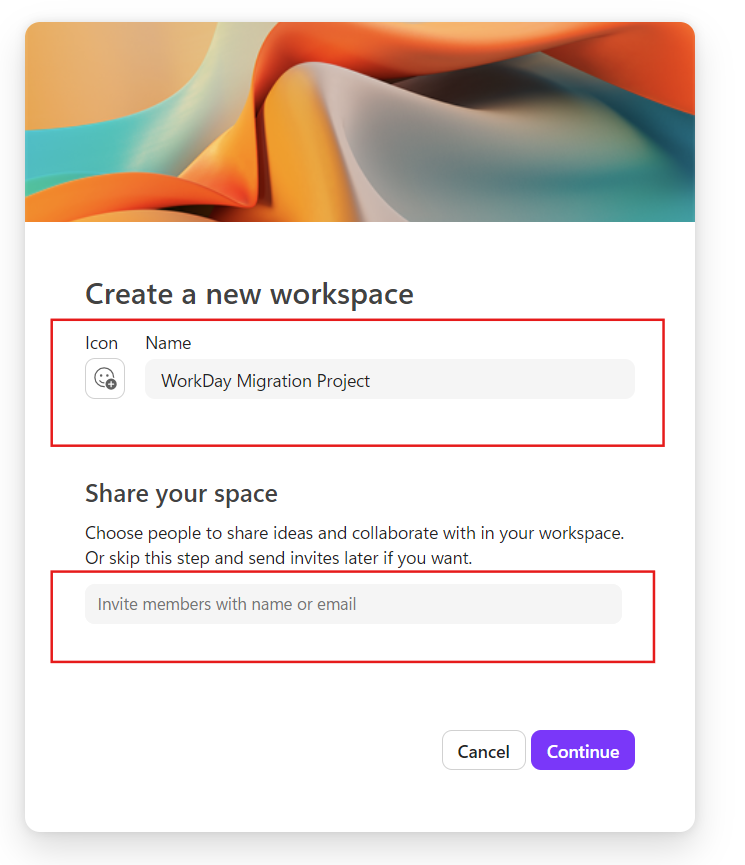
Leverage a Loop workspace for taking notes and utilizing its extra features like tables, task lists, linked pages, and retrospectives. This helps in keeping all your project-related notes organized and easily accessible. The one caveat here is that the MS Team does not "come with" a Loop workspace already generated so you need to go into Loop and create a new workspace and add all of the members you added to your MS Team to the Loop Workspace.
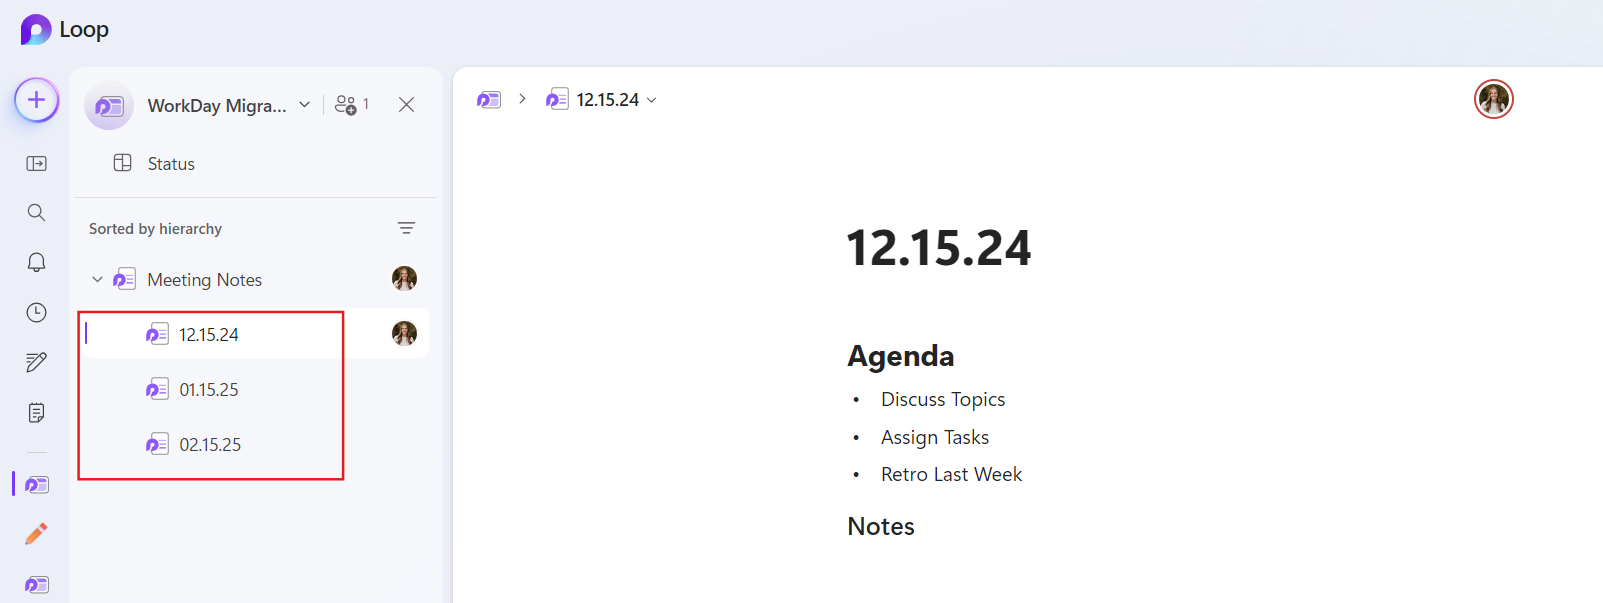
Then I "loosely connect" that Loop Workspace by choosing the "URL" tab at the top of the channel and paste the URL to the Loop Workspace so that you can quickly access the Loop Workspace in the browser experience from your Team. I make a Loop page called "Meetings" and nest each meeting note page under that Meetings Page.
Create the Loop Workspace and add the same MS Team Members to the Project Workspace
Go to Microsoft Loop (cloud.microsoft) to get started with Loop
Add Loop as a URL Tab

Loop Tab

Look Inside Loop
📌 Pro-tip: I title each meeting page with the date of the meeting to easily track meeting notes.
BONUS: Not only can you capture notes in Loop but you can capture tasks, surface your planner boards, brainstorm project content, and even create presentations. I also often link files from the Team SharePoint into Loop for faster access during meetings. **Make sure to choose the link option for the file and NOT "upload file" as you want the file to stay stored in the Team SharePoint not in OneDrive.
Planner - Project Planning
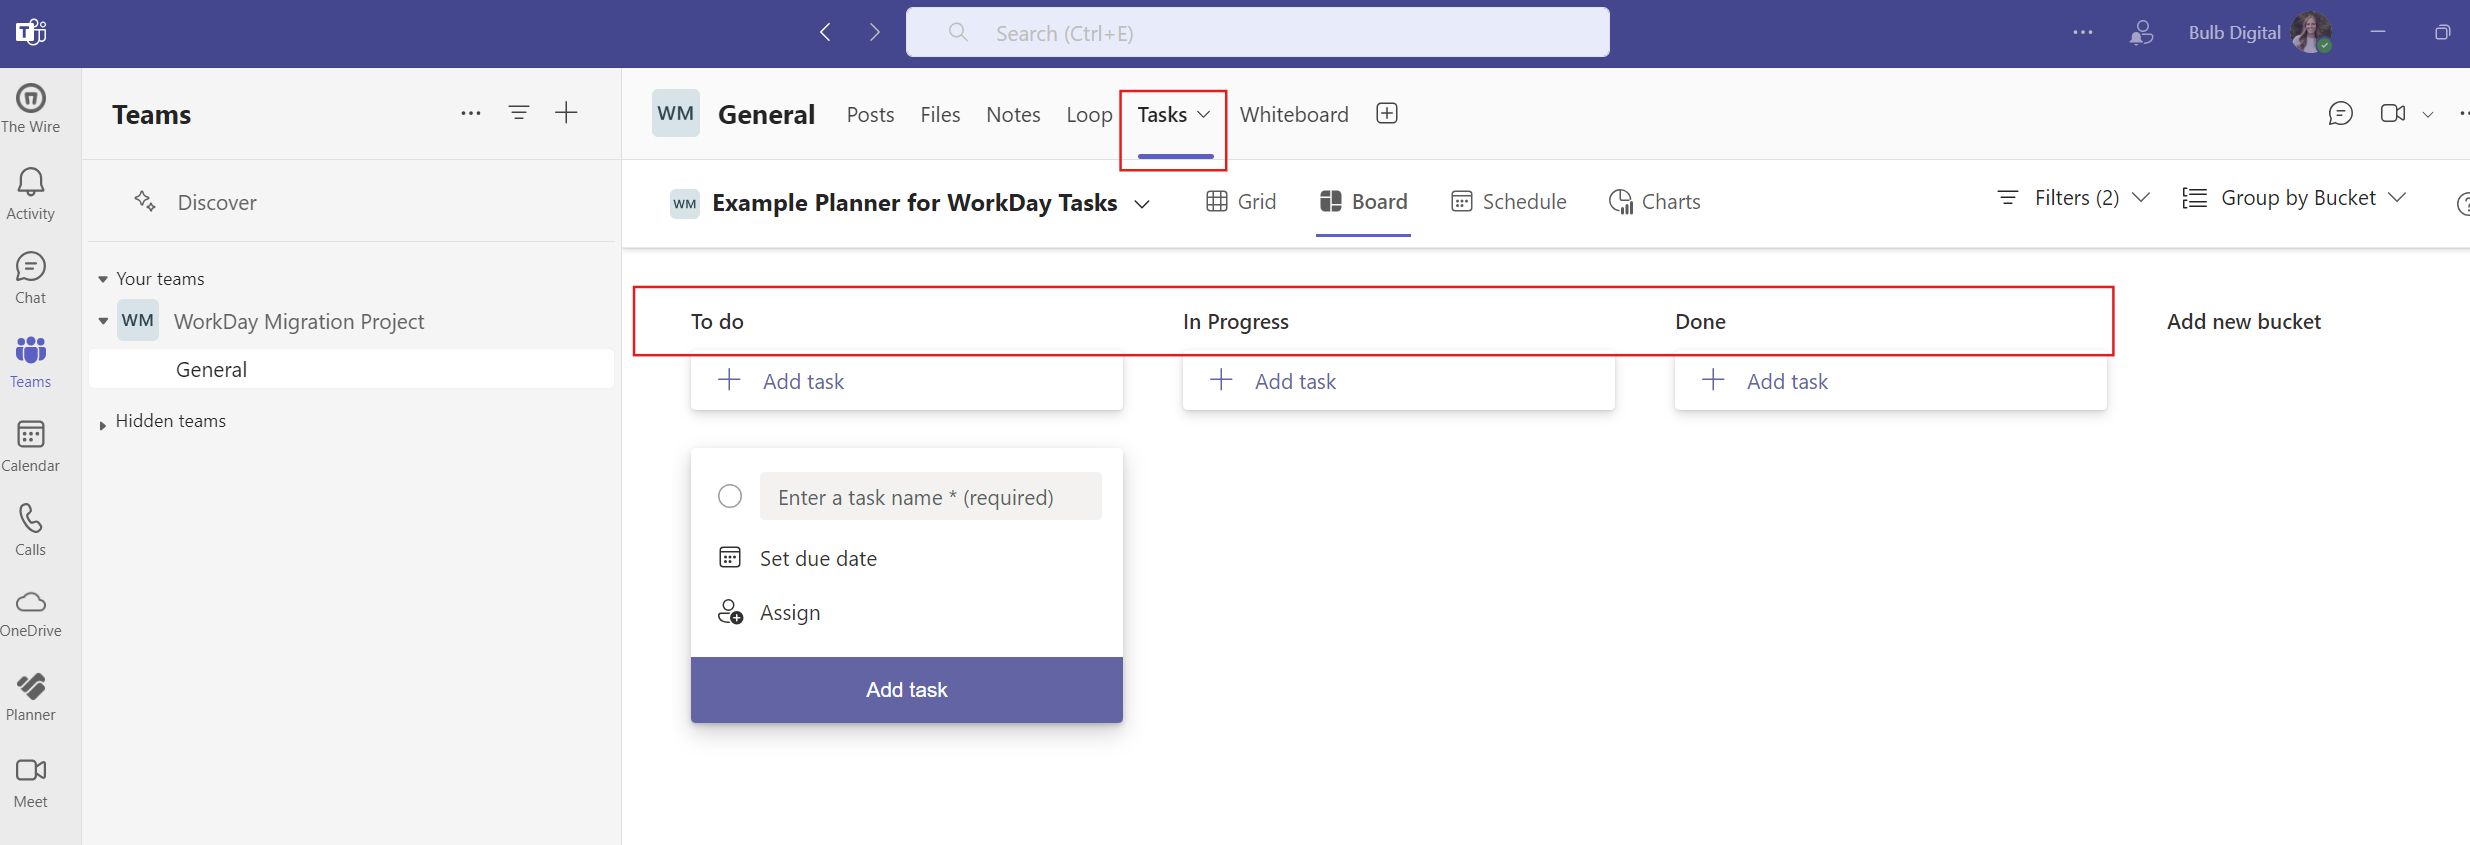
Utilize Planner for simple project planning. It helps you create and manage tasks, set deadlines, and track progress, ensuring that your project stays on schedule. Creating a tab to access your Planner board centralizes project information into one dashboard and you can choose from the MS Team how you want to view the planner board (in Teams or in browser). Personally, I have my planner boards as tabs but usually click the carrot menu to open the planner board in my browser and work from there because I find the browser experience to be better quality but it's really a personal preference.

📌 Pro-tip: set up a simple Kan Ban board for tasks - To Do, In Progress, Done to visually track project status as tasks make their way across the board to complete.
Tasks
For task management, when you create tasks in Planner and assign them they will surface in each specific team members "To Do." Both of these tools allow you to assign tasks, set priorities, and monitor completion, making it easier to manage individual and team responsibilities.

Whiteboard
While you can link Whiteboard as a tab at the top, I've found Loop works better for everything that I had been using Whiteboard for so I hardly use Whiteboard anymore but if you are a true-blue Whiteboard fan you can create a Whiteboard tab as well. I find the only thing I still use Whiteboard for over Loop is process mapping, although Whimsical is actually my go-to for that. Sorry Microsoft!

Decision Making & Gaining Consensus
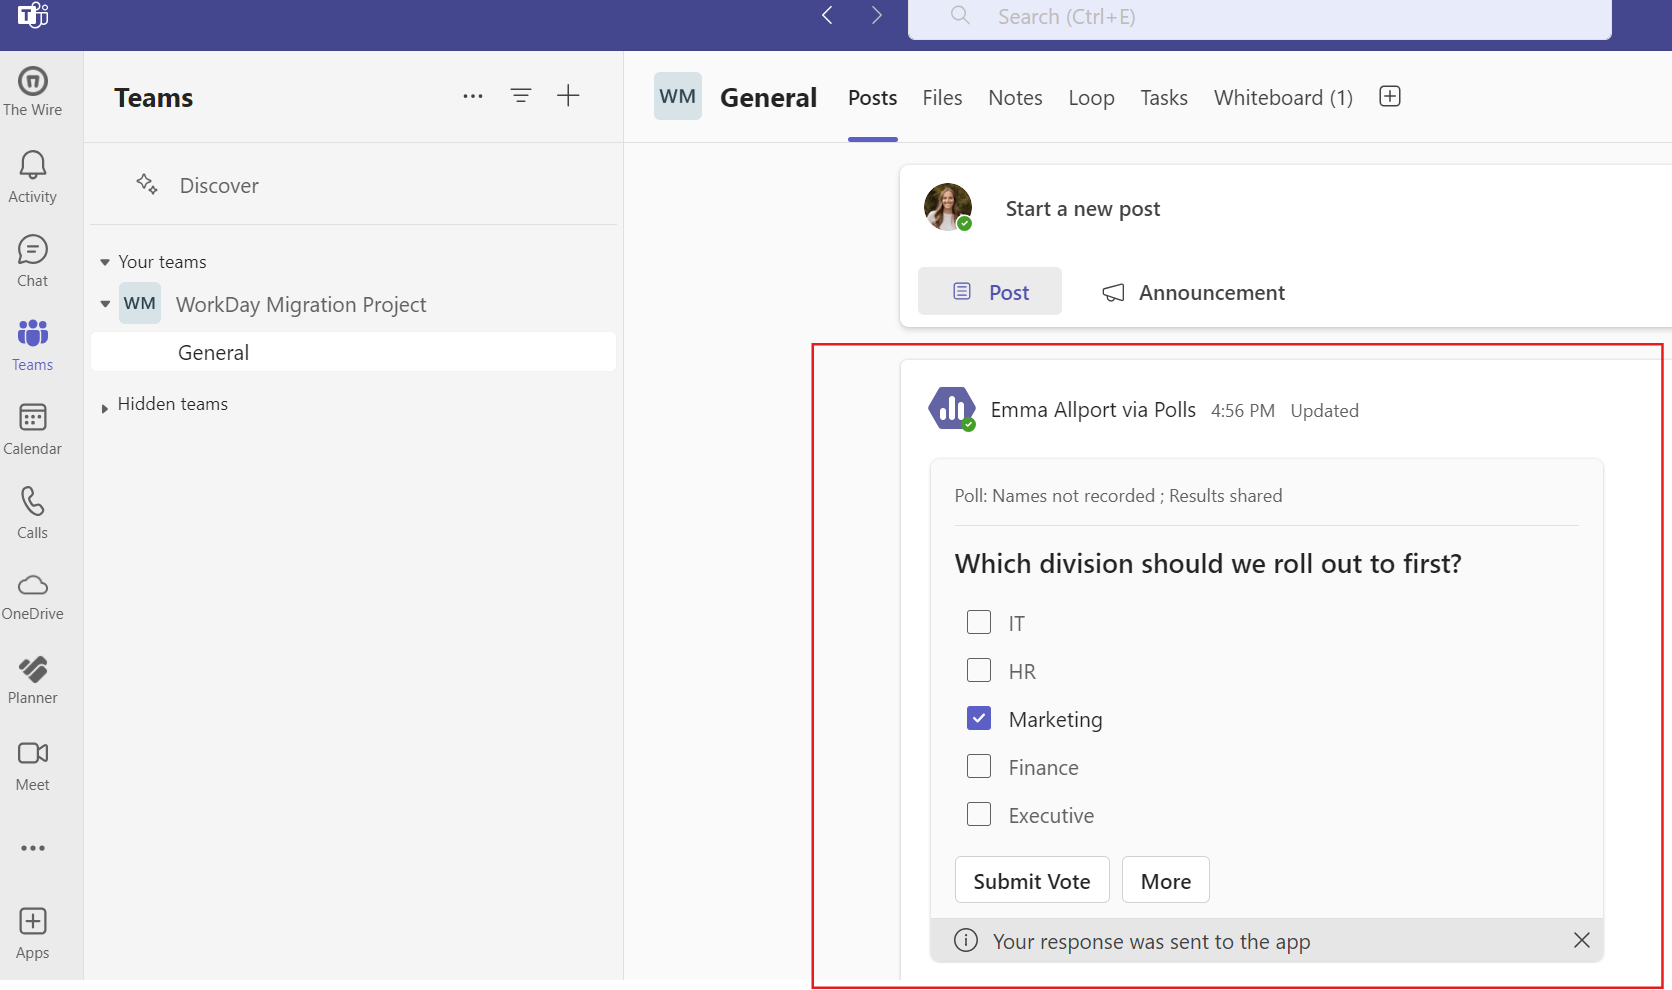
To gain consensus within the team, use tools like Polls within a Post and schedule channel meetings for regular stand-ups. These features help in making informed decisions and ensure all team members are on the same page.
Conclusion
Microsoft Teams is a powerful tool for managing projects, offering features that enhance communication, organization, and collaboration. By setting up your MS Team and your first Channel using Tabs effectively, you can create a centralized hub for your project, ensuring everyone stays on the same page and works efficiently! I hope you try out Loop and all its features, as Microsoft works to integrate Teams and Loop more closely in the coming months. I see a bright future for making project management in M365 more intuitive.
💫 BONUS TIP
If you made it this far on this blog I feel like you deserve a bonus tip - you know that annoying toolbar that always gets in the way when you're sharing your screen in a Teams meeting and trying to switch tabs? You can click the toolbar and hit "CTRL + W" and it will close out of the toolbar completely. You can thank me later! 🙂


